Volvo CE Battery & Electrical System: Maintenance for Reliable Starting
The electrical system is often the last thing checked during routine maintenance — until it fails. Battery failure is the #1 cause of machinery downtime in fleet operations worldwide, outpacing even hydraulic failures. A well-maintained 24V electrical system on a Volvo CE machine should last 3–5 years in normal conditions; a neglected system may fail in 12–18 months. → Batteries and electrical system components in stock at VMP Spares.
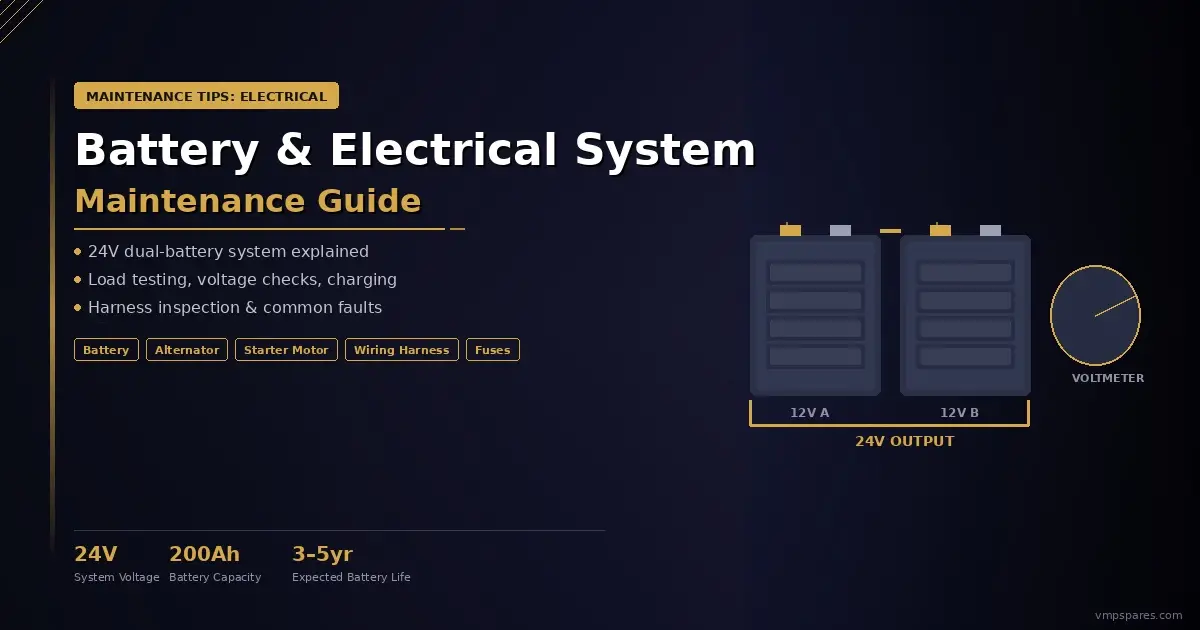
Understanding the Volvo CE 24V Electrical System
All Volvo CE construction machines use a 24V electrical system, formed by connecting two 12V batteries in series. This provides the higher voltage needed for starter motors (4.5–8kW) on large diesel engines. The system typically uses two 170–200Ah batteries, charged by a 70–95A alternator. Key components and their roles:
| Component | Specification | Function |
|---|---|---|
| Batteries (×2) | 12V, 170–200Ah each | Energy storage — 24V in series configuration |
| Alternator | 24V, 70–95A | Recharge batteries + supply running loads |
| Starter motor | 24V, 4.5–8kW | High-current engine cranking |
| Main relay/contactor | 24V, 200A+ | Master power switch — protects wiring |
| Fuse box / relay panel | Various ratings | Circuit protection |
| ECU / VCU / ICF | 24V logic supply | Machine brain — very sensitive to voltage spikes |
Battery failing on your Volvo CE machine? We stock 12V 170Ah and 200Ah batteries compatible with all Volvo CE equipment — same-day dispatch available.
Battery Maintenance Schedule
Batteries fail in predictable ways that can be detected early. Regular testing and cleaning prevents the majority of unexpected battery failures in the field:
| Maintenance Task | Interval | How To |
|---|---|---|
| Visual inspection | Weekly / every 50h | Check for cracking, swelling, terminal corrosion |
| Terminal cleaning | Every 250h | Remove corrosion with wire brush; apply terminal grease |
| Voltage check (at rest) | Every 250h | >12.6V = good; 12.0–12.4V = recharge; <12V > |
| Load test | Every 500h or annually | Professional load tester: fail if >50% voltage drop under load |
| Electrolyte level (flooded) | Every 500h | Top up with distilled water — never tap water |
| Full replacement | 3–5 years or when load test fails | Always replace both batteries simultaneously |
Battery Testing: What the Numbers Mean
| Open Circuit Voltage | State of Charge | Condition |
|---|---|---|
| 12.65–12.77V | 100% charged | Excellent — fully charged |
| 12.45–12.65V | 75–100% | Good — needs short drive to top up |
| 12.24–12.45V | 50–75% | Fair — charge before testing |
| 12.06–12.24V | 25–50% | Poor — charge fully, load test |
| <12.06V | <25% | Critical — likely sulfated; replace |
Alternator Maintenance & Testing
The alternator charges the batteries and supplies power to all running loads. A failing alternator causes gradual battery depletion — the machine starts fine but batteries don’t recover during operation. Symptoms include battery warning light, dim lights at idle, and eventual failure to start after extended operation. → Alternator and charging system parts:
| Test | Expected Result | Failure Indication |
|---|---|---|
| Voltage at battery with engine running (1,500 RPM) | 13.8–14.4V per battery pair = 27.6–28.8V total | <26V: alternator or wiring problem |
| Voltage at battery at idle (700–900 RPM) | Should be >26V even at idle | <24V at idle: alternator weak |
| Voltage rise from off to running | Should rise 1.5–2V above battery resting voltage | If no rise: alternator not charging |
| Amperage output (clamp meter on main cable) | Should approach rated output under heavy load | <50% rated output: internal fault |
Wiring & Harness Maintenance
Wiring harness failures cause intermittent faults that are notoriously difficult to diagnose. The highest-risk harness locations on Volvo CE machines are the boom/arm harness (constant flexing), connections near the slewing ring (rotation-induced fretting), and harness segments routed through cab floor penetrations (moisture entry). Maintenance priorities:
| Location | Failure Mode | Inspection Interval |
|---|---|---|
| Boom/arm harness | Flexing → insulation crack → short circuit | Every 250h: inspect conduit and connectors |
| Slewing ring pass-through | Rotary wear → bare wires | Every 500h: check routing and condition |
| Cab floor penetration | Moisture ingress → corrosion | Every 500h: check sealant around grommet |
| Battery cable ends | Corrosion → high resistance → voltage drop | Every 250h: clean and re-grease terminals |
| Relay panel connectors | Vibration loosening → intermittent | Every 1,000h: reseat all connectors |
Common Electrical Failure Symptoms & Solutions
| Symptom | Likely Cause | Diagnostic Approach |
|---|---|---|
| Slow cranking / won’t start | Weak battery or high-resistance connection | Load test batteries; check cable resistance |
| Battery light on during operation | Alternator fault or drive belt slip | Test alternator output; check belt tension |
| Intermittent electrical faults | Loose connector or chafed wire | Wiggle test harness sections; thermal camera |
| ECU fault codes after jump-start | Voltage spike from incorrect jump procedure | Always jump 24V systems correctly — + to +, – to – |
| Lights flickering at idle | Alternator output too low at idle | Check idle speed; test at rated speed |
| Total electrical loss | Main fuse or battery contactor failure | Check main fuse; test contactor coil |
→ Related: Winter storage guide | Cab & electrical parts guide | Pre-season inspection checklist
Ready to Find Your Part?
354,000+ Volvo CE parts | 669 machine models | 6-month warranty | Worldwide shipping
We typically respond within 2 hours with availability and pricing.